Prototype Development
Chapter 06 · Automotive Product Development
Use the infographic for the process overview, then follow the chapter sections for definitions, activities, deliverables, gate evidence, and implementation detail.
Chapter infographic
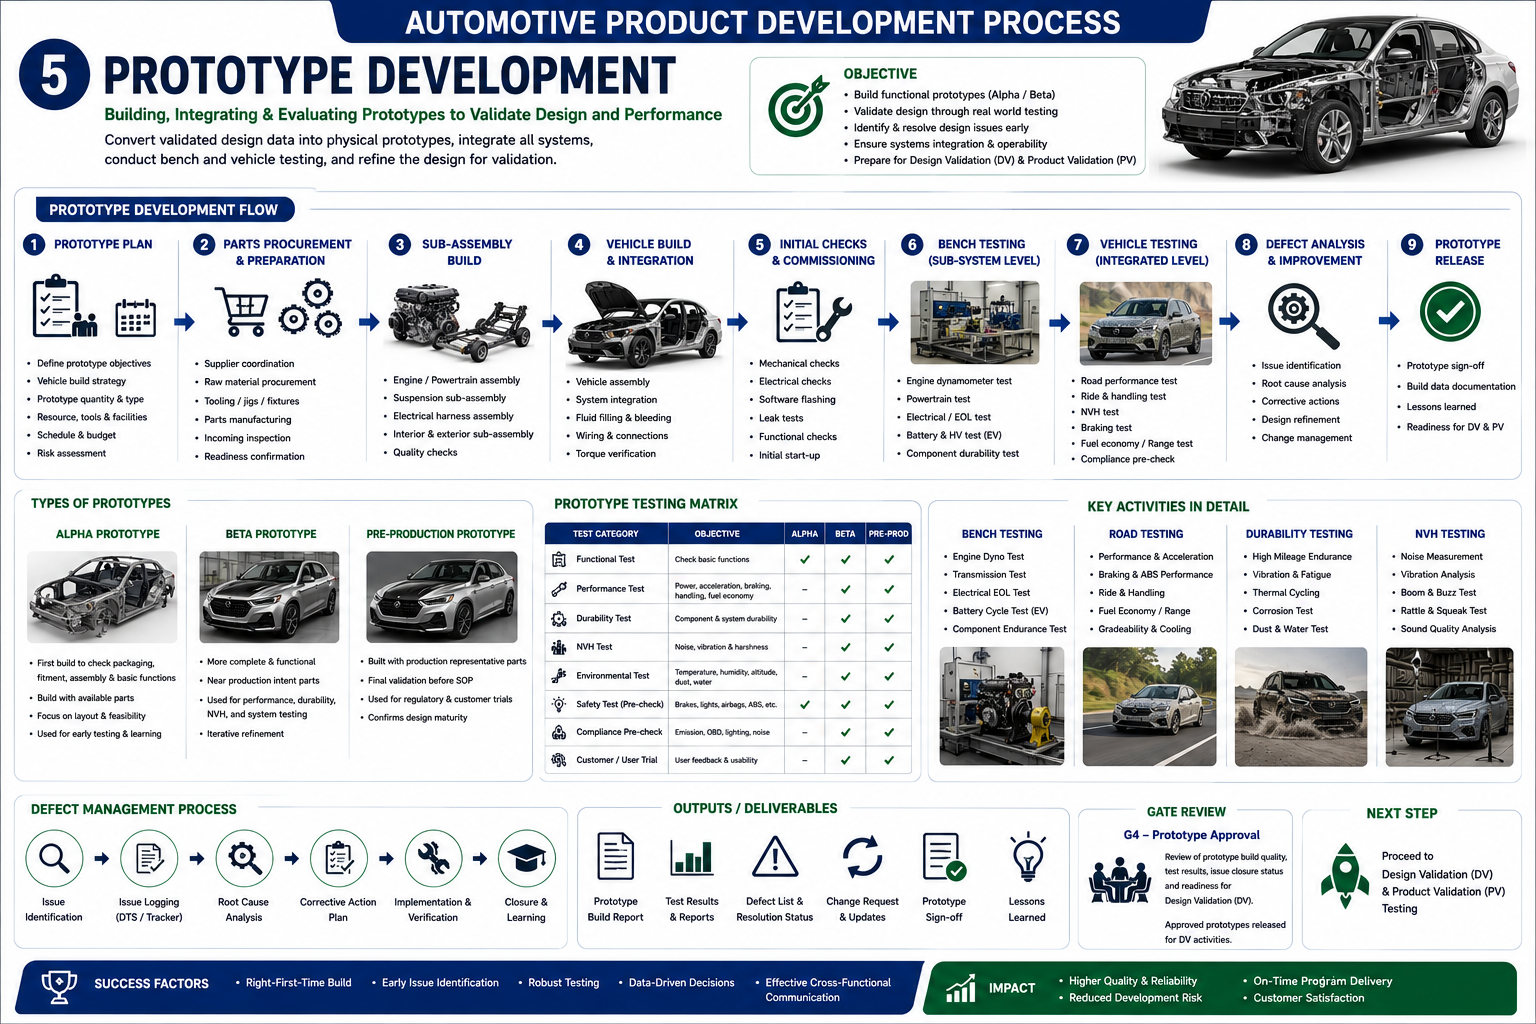
Prototype Development in Automotive Product Development
Building, Integrating & Evaluating Prototypes to Validate Design and Performance
Prototype Development is a critical phase in the Automotive Product Development Process. After the detailed design and engineering data are completed, the next step is to convert the digital design into physical prototype vehicles.
A prototype allows the engineering team to verify whether the design works in real conditions. It helps identify design issues, integration problems, manufacturing concerns, performance gaps, quality defects, and compliance risks before moving to Design Validation and Product Validation testing.
In simple terms, this phase answers the question:
“Can the approved engineering design be physically built, integrated, tested, and improved before production?”
1. Objective of Prototype Development
The main objective of Prototype Development is to build functional prototype vehicles and evaluate their performance, durability, reliability, safety, serviceability, and system integration.
The objectives include:
Build functional Alpha and Beta prototypes.
Validate design through bench testing and real-world testing.
Identify and resolve design issues at an early stage.
Confirm system integration and operability.
Prepare vehicles for Design Validation (DV) and Product Validation (PV).
Verify prototype build quality before formal validation starts.
Capture lessons learned for future design improvement.
Prototype Development acts as the bridge between Detailed Design & Engineering and Design/Product Validation Testing.
2. Prototype Development Flow
The prototype development process normally follows a structured flow.
Step 1: Prototype Plan
Prototype planning defines the purpose, quantity, configuration, and build strategy for prototype vehicles.
Key Activities
Define prototype objectives.
Decide prototype type: Alpha, Beta, or Pre-Production.
Define vehicle build strategy.
Decide prototype quantity.
Identify required systems and parts.
Prepare resource plan.
Identify required tools, jigs, and fixtures.
Define build location.
Prepare schedule and budget.
Conduct risk assessment.
Why It Is Important
Poor prototype planning can lead to missing parts, incorrect configuration, delayed testing, and incomplete validation. Therefore, the prototype plan must clearly define what needs to be built, why it is being built, and how it will be used.
Step 2: Parts Procurement & Preparation
Once the prototype plan is approved, required parts are procured or manufactured.
Key Activities
- Supplier coordination
- Raw material procurement
- Prototype part manufacturing
- Tooling, jigs, and fixture preparation
- Incoming inspection
- Part quality verification
- Readiness confirmation
- Engineering change confirmation
Prototype parts may be produced using soft tooling, rapid prototyping, CNC machining, 3D printing, fabrication, or temporary manufacturing processes.
Important Checks
- Correct part number
- Latest drawing revision
- Correct material
- Correct surface finish
- Dimensional accuracy
- Supplier inspection report
- Critical part availability
Step 3: Sub-Assembly Build
Before complete vehicle build, major systems are assembled separately.
Typical Sub-Assemblies
- Engine / powertrain assembly
- Suspension sub-assembly
- Brake system assembly
- Electrical harness assembly
- Interior and exterior sub-assembly
- Cooling system assembly
- Fuel system assembly
- Battery system assembly for EVs
- Chassis / frame assembly
Key Activities
- Assembly of major modules
- Fitment verification
- Quality inspection
- Torque verification
- Initial interface checks
- Part mismatch identification
Sub-assembly build helps detect part-level and system-level issues before complete vehicle integration.
Step 4: Vehicle Build & Integration
In this step, all systems are integrated into a complete prototype vehicle.
Key Activities
- Vehicle assembly
- System integration
- Fluid filling
- Brake bleeding
- Coolant filling
- Fuel system check
- Electrical wiring connection
- ECU installation
- Software flashing
- Torque verification
- Initial fit and finish check
Typical Issues Found
- Packaging interference
- Bracket mismatch
- Connector mismatch
- Harness routing issues
- Hose routing problems
- Insufficient clearance
- Torque access difficulty
- Serviceability concerns
This stage is very important because many design problems appear only when all systems are physically assembled together.
Step 5: Initial Checks & Commissioning
After prototype build, the vehicle must undergo basic commissioning checks before testing.
Key Activities
- Mechanical checks
- Electrical checks
- Software flashing
- Diagnostic scan
- Leak tests
- Functional checks
- Brake system check
- Lighting check
- Instrument cluster check
- Initial start-up
- Safety inspection
Purpose
The purpose is to confirm that the prototype is safe and functional before bench or road testing starts.
For example, before a motorcycle prototype is tested on road, engineers must confirm brake operation, throttle response, clutch operation, lighting, tyre pressure, fluid leakage, and electrical system performance.
Step 6: Bench Testing – Sub-System Level
Bench testing validates individual systems or components before complete vehicle testing.
Typical Bench Tests
- Engine dynamometer test
- Powertrain test
- Transmission test
- Vehicle Fatigue Durability Test on Multi Axial test rig
- Electrical End-of-Line test
- Battery and HV test for EVs
- Component durability test
- Brake component test
- Suspension component test
- Cooling system test
- Fuel system test
Purpose
Bench testing helps identify system-level issues in a controlled environment before exposing the complete vehicle to road conditions.
Step 7: Vehicle Testing – Integrated Level
After bench testing, the complete prototype vehicle is tested under controlled and real-world conditions.
Typical Vehicle Tests
- Road performance test
- Ride and handling test
- NVH test
- Braking test
- Fuel economy test
- Range test for EVs
- Gradeability test
- Cooling performance test
- Compliance pre-check
- Functional safety check
- Customer usage simulation
- Pre-Homologation Test
Purpose
Vehicle testing checks whether all systems work together as a complete product.
For example, the engine may pass a bench test independently, but in the vehicle, it may face cooling issues, NVH issues, exhaust routing issues, or control calibration problems.
Step 8: Defect Analysis & Improvement
Prototype testing usually identifies several issues. These issues must be recorded, analysed, and corrected.
Key Activities
- Issue identification
- Defect logging
- Root cause analysis
- Corrective action planning
- Design refinement
- Engineering change management
- Verification testing
- Closure of open issues
Common Defects
- Noise and vibration
- Leakage
- Electrical failure
- Software calibration issue
- Poor fit and finish
- Component interference
- Overheating
- Brake performance gap
- Durability failure
- Service access issue
The goal is not only to fix the issue but also to prevent recurrence in future builds.
Step 9: Prototype Release
After testing and defect closure, the prototype is released for the next development stage.
Key Activities
- Prototype sign-off
- Build data documentation
- Test result summary
- Open issue review
- Lessons learned capture
- Readiness confirmation for DV and PV
Output
The final output is an approved prototype vehicle ready for formal validation testing.
3. Types of Prototypes
Prototype vehicles are normally developed in different maturity levels.
3.1 Alpha Prototype
An Alpha prototype is the first physical prototype built to check basic packaging, fitment, assembly, and functionality.
Purpose
Check packaging feasibility.
Verify basic assembly.
Confirm component fitment.
Identify early design issues.
Support engineering learning.
Characteristics
- First build
- Limited functionality
- May use temporary parts
- May not be production representative
- Used mainly for engineering checks
Typical Use
- Packaging verification
- Layout confirmation
- Assembly feasibility check
- Basic functional testing
3.2 Beta Prototype
A Beta prototype is more complete and functional than the Alpha prototype.
Purpose
Validate functionality.
Conduct performance checks.
Support durability testing.
Support NVH testing.
Support system-level evaluation.
Characteristics
- More complete design
- Closer to production intent
- Better part quality
- Used for performance and durability checks
- Supports iterative improvement
Typical Use
- Ride and handling testing
- Brake testing
- Durability testing
- NVH testing
- Electrical system testing
- Calibration development
3.3 Pre-Production Prototype
A pre-production prototype is built using production-representative parts and processes.
Purpose
Confirm final design maturity.
Validate production-intent parts.
Support regulatory and customer trials.
Confirm readiness before SOP.
Characteristics
- Production representative parts
- Final design level
- Used before SOP
- Used for homologation and final validation
- Confirms production readiness
Typical Use
- Final validation
- Regulatory pre-check
- Customer clinics
- Manufacturing process trials
- Quality confirmation
4. Prototype Testing Matrix
A prototype testing matrix helps define which tests are required for Alpha, Beta, and Pre-Production vehicles.
This matrix ensures that prototype vehicles are used effectively depending on their maturity level.
5. Key Activities in Detail
5.1 Bench Testing
Bench testing is performed at component or system level.
Examples
- Engine dyno test
- Transmission test
- Electrical EOL test
- Battery cycle test for EVs
- Component endurance test
- Brake dynamometer test
- Suspension rig test
Benefits
- Controlled test environment
- Faster issue identification
- Lower risk than road testing
- Useful for early design correction
5.2 Road Testing
Road testing evaluates the complete vehicle in real driving conditions.
Examples
- Performance and acceleration
- Braking and ABS performance
- Ride and handling
- Fuel economy
- EV range
- Gradeability
- Cooling performance
- Steering response
- High-speed stability
Benefits
- Validates real-world behaviour
- Checks customer usage conditions
- Confirms complete vehicle integration
5.3 Durability Testing
Durability testing confirms that the vehicle can withstand long-term usage.
Examples
- High mileage endurance
- Vibration and fatigue testing
- Thermal cycling
- Corrosion testing
- Dust testing
- Water testing
- Rough road testing
- Load testing
Purpose
Durability testing helps prevent field failures, warranty claims, and customer dissatisfaction.
5.4 NVH Testing
NVH testing evaluates customer comfort and perceived quality.
Examples
- Noise measurement
- Vibration analysis
- Boom noise testing
- Buzz, squeak, and rattle testing
- Rattle and squeak test
- Sound quality analysis
Importance
Even if a vehicle is mechanically reliable, poor NVH performance can create a negative customer impression.
6. Defect Management Process
Prototype Development must include a strong defect management system.
Step 1: Issue Identification
Issues are identified during build, inspection, bench testing, road testing, or customer trials.
Step 2: Issue Logging
All issues are recorded in a defect tracking system.
Typical information includes:
- Issue description
- Vehicle number
- Part number
- Test condition
- Severity
- Responsible department
- Target closure date
- Photos and evidence
Step 3: Root Cause Analysis
The team identifies the actual cause of the issue.
Common tools include:
5 Why Analysis
- Fishbone Diagram
- Fault Tree Analysis
- Design review
- Test data analysis
- Supplier investigation
Step 4: Corrective Action Plan
Corrective actions may include:
- Design change
- Material change
- Process change
- Supplier correction
- Software update
- Calibration update
- Assembly process correction
Step 5: Implementation & Verification
Corrective action is implemented and verified through repeat testing.
Step 6: Closure & Learning
The issue is closed only after verification. Lessons learned should be captured for future projects.
7. Outputs and Deliverables
At the end of Prototype Development, the following deliverables are expected:
These deliverables become important inputs for Design Validation and Product Validation testing.
8. Gate Review – G4 Prototype Approval
Prototype Development ends with G4 – Prototype Approval.
Purpose of G4 Review
To review prototype build quality, test results, issue closure status, and readiness for Design Validation.
Review Points
Prototype build completed.
Build quality accepted.
Major issues identified and addressed.
Critical safety checks completed.
Test results reviewed.
Open issues categorized.
Engineering changes updated.
Prototype readiness confirmed.
Approval given for DV and PV testing.
After G4 approval, the project proceeds to:
Design Validation (DV) and Product Validation (PV) Testing
9. Success Factors
Successful Prototype Development depends on:
- Right-first-time build
- Early issue identification
- Robust testing
- Data-driven decisions
- Effective cross-functional communication
- Strong supplier coordination
- Accurate build documentation
- Fast corrective action closure
- Proper change management
- Clear prototype configuration control
10. Impact of Effective Prototype Development
A well-managed prototype phase provides major benefits.
Effective prototype development reduces development risk and increases confidence before formal validation testing begins.
11. Practical Example: Motorcycle Prototype Development
For a motorcycle, prototype development may include:
- Frame prototype build
- Engine mounting verification
- Fuel tank fitment
- Exhaust routing
- Radiator mounting
- Brake hose routing
- ABS modulator packaging
- Wiring harness routing
- Lighting and indicator fitment
- Seat height and rider triangle check
- Side stand and centre stand fitment
- Chain clearance
- Suspension travel check
- Noise and emission pre-check
- Road performance evaluation
Common prototype issues in motorcycles include vibration, heat protection, wiring harness fouling, exhaust clearance, brake hose routing, and serviceability concerns.
12. Practical Example: EV Prototype Development
For an electric vehicle, prototype development may include:
- Battery pack installation
- Battery mounting verification
- High-voltage cable routing
- Motor and inverter fitment
- Charger installation
- Cooling system filling and bleeding
- BMS software flashing
- HV safety check
- Insulation resistance check
- Thermal testing
- Range evaluation
- Regenerative braking calibration
- EMC pre-check
- Charging performance check
EV prototype development requires special focus on high-voltage safety, thermal management, software calibration, battery protection, and diagnostics.
13. Common Risks in Prototype Development
Typical risks include:
- Late part availability
- Wrong revision parts
- Supplier delay
- Poor prototype part quality
- Build sequence issues
- Packaging interference
- Software mismatch
- Electrical communication errors
- Leakage
- Insufficient torque access
- Safety issues during testing
- Incomplete defect tracking
- Delayed corrective actions
- Prototype configuration mismatch
- Insufficient test readiness
These risks should be monitored through a prototype readiness checklist and project risk register.
14. Best Practices
For effective Prototype Development, OEMs and suppliers should follow these best practices:
Freeze prototype configuration before build.
Use latest drawings and engineering revisions.
Conduct part readiness review before build.
Use a prototype build checklist.
Maintain vehicle-wise build records.
Conduct daily build review during prototype assembly.
Capture all issues with photos and evidence.
Use a defect tracking system.
Prioritize safety-critical issues.
Conduct root cause analysis for major failures.
Verify corrective actions before closure.
Maintain lessons learned database.
Conduct formal G4 Prototype Approval review.
Conclusion
Prototype Development is the first major physical confirmation of the engineering design. It converts digital design data into real vehicles, integrates all systems, identifies design and build issues, supports early testing, and prepares the project for formal validation.
A disciplined prototype development process helps reduce risk, improve quality, control cost, shorten development time, and increase confidence before Design Validation and Product Validation.
The final output of this phase is:
An approved prototype vehicle with documented build quality, test results, defect closure status, and readiness for DV and PV testing.
Key Takeaways
Prototype Development converts engineering design into physical vehicles.
Alpha, Beta, and Pre-Production prototypes have different maturity levels and test purposes.
Bench testing and vehicle testing are both important.
Defect management is a core part of prototype development.
G4 Prototype Approval confirms readiness for DV and PV testing.
Effective prototype development reduces late-stage failures, cost, and project delays.
Reference tables from the source chapter
| Test Category | Objective | Alpha | Beta | Pre-Production |
|---|---|---|---|---|
| Functional Test | Check basic functions | Yes | Yes | Yes |
| Performance Test | Power, acceleration, braking, handling | Limited | Yes | Yes |
| Durability Test | Component and system durability | No / Limited | Yes | Yes |
| NVH Test | Noise, vibration, harshness | Limited | Yes | Yes |
| Environmental Test | Temperature, humidity, altitude, dust, water | No / Limited | Yes | Yes |
| Safety pre-check | Brakes, lighting, airbags, ABS, etc. | Yes | Yes | Yes |
| Compliance pre-check | Emission, OBD, lighting, noise | Limited | Yes | Yes |
| Customer / User Trial | Usability and customer feedback | No | Limited | Yes |
Reference table 2
| Deliverable | Purpose |
|---|---|
| Prototype Build Report | Records build process, parts used, issues, and build quality |
| Test Results & Reports | Summarizes bench and vehicle test results |
| Defect List & Resolution Status | Tracks all issues and closure status |
| Change Requests & Updates | Records required engineering changes |
| Prototype Sign-Off | Confirms prototype readiness |
| Lessons Learned | Captures improvement points for future projects |
Reference table 3
| Area | Impact |
|---|---|
| Quality | Early detection of design and build issues |
| Reliability | Better durability and long-term performance |
| Cost | Reduced late changes and rework |
| Timing | Faster validation readiness |
| Compliance | Early regulatory pre-check possible |
| Customer Satisfaction | Improved final product maturity |
| Program Delivery | Better control before DV/PV |
Frequently asked questions
What is the difference between alpha and beta prototypes?
Alpha builds focus on package, assembly, and early function. Beta builds are more complete and support performance, durability, NVH, reliability, and integrated-system testing.
Why are prototype issues formally tracked?
A controlled tracker preserves evidence, assigns ownership, links root cause to corrective action, and prevents known defects from carrying into validation or production.
When is a prototype approved for DV and PV?
Approval follows confirmation of build quality, functional readiness, test evidence, critical issue closure, and configuration control.
Related articles
Phase review toolkit
Why this phase matters
A prototype is valuable only when its configuration and learning objective are controlled well enough to support a decision.
Inputs, outputs and gate review
- Inputs: Design baseline, build objectives, parts, software, test instrumentation and issue hypotheses.
- Outputs: Traceable prototype vehicles, build learning, integration issues and verified corrective actions.
- Gate-review summary: Confirm build configuration, deviation handling, safety readiness and the test evidence each prototype can legitimately support.
Chapter Checklist
- Inputs are controlled and traceable
- Outputs have an accountable owner and approval status
- Open risks include containment, due date and decision authority
- Configuration and assumptions match downstream evidence
- Compliance and change impacts are recorded